Kathleen-en: Unterschied zwischen den Versionen
Tina (Diskussion | Beiträge) Keine Bearbeitungszusammenfassung |
Tina (Diskussion | Beiträge) |
||
| Zeile 1: | Zeile 1: | ||
=Kathleen= | |||
This page describes the setup of a Freifunk router using the Firmware Kathleen. | This page describes the setup of a Freifunk router using the Firmware Kathleen. | ||
| Zeile 9: | Zeile 9: | ||
TP-Link: WDR3500, WDR3600, WDR4300, WDR4900, CPE210,220,510,520, WR740N+ND, WR741N+ND, WR743N+ND, WR841N+ND, WR842ND, WR1043ND<br /> | TP-Link: WDR3500, WDR3600, WDR4300, WDR4900, CPE210,220,510,520, WR740N+ND, WR741N+ND, WR743N+ND, WR841N+ND, WR842ND, WR1043ND<br /> | ||
Ubiquiti: Nanostation M2 and M5 (also Loco plus Nanobridge Image), Nanobridge M2 and M5<br /> | Ubiquiti: Nanostation M2 and M5 (also Loco plus Nanobridge Image), Nanobridge M2 and M5<br /> | ||
==Preparation== | ==Preparation== | ||
Version vom 18. Juli 2016, 16:27 Uhr
Kathleen
This page describes the setup of a Freifunk router using the Firmware Kathleen.
Supported Hardware
Starting with Kathleen 0.1.2, the following routers are supported:
TP-Link: WDR3500, WDR3600, WDR4300, WDR4900, CPE210,220,510,520, WR740N+ND, WR741N+ND, WR743N+ND, WR841N+ND, WR842ND, WR1043ND
Ubiquiti: Nanostation M2 and M5 (also Loco plus Nanobridge Image), Nanobridge M2 and M5
Preparation
Getting IP Adresses
Mesh-IP
Select an IP address for your router on the page IP-Bereich, or ask for an IP adress via the Freifunk Mailing List.
DHCP Range
Devices that are going to connect to the router will get their IP adresses assigned via DHCP. Select the size of the DHCP range, depending on the expected traffic on your router. See IP-Bereich.
Rule of thumb:
- Router at home: network size 32 (=number of possible clients)
- Router in a public place such as restaurant, club: network size 64 - 128
- Router offering roaming: network size 256
Getting the VPN Key
To share your internet uplink in a secure way, you need a VPN key. The VPN key is assigned by Freifunk Berlin. Please fill out the application form at http://ca.berlin.freifunk.net. You need to provide an (arbitrary) name for your VPN connection, plus your email address.
Downloading and Installing the Firmware
- Download the firmware at http://berlin.freifunk.net/downloads/.
Erstinstallation (Initial Installation)
- If your router still has the original firmware of the manufacturer installed (e.g. if your router is new), you need to select Erstinstallation (initial installation).
- Please consult the manufacturers manual of your router on how to update the firmware - and use these instructions to upload the Freifunk firmware to the router.
Aktualisierung (Update)
- Select Aktualisierung (Update) if your router already has a Freifunk firmware or an OpenWRT version (not DDwrt) installed.
Setup
Access the router at http://192.168.42.1, after you have uploaded the firmware.
Setting the Password
Enter a password (and make sure to remember it).
Master Data
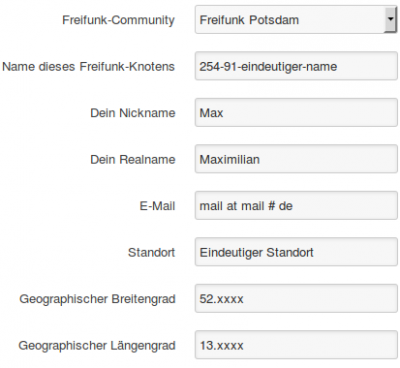
Node Name (Knotenname): The first two numbers are the last two octets of your Mesh-IP. The last part (xxx) should help to identify the router, e.g. by a name or a location.
Example: Mesh IP 10.22.254.91 --> Node Name 254-91-xxx
Location (Standort): Name of the street, where your router is located.
If during the installation the router is connected with your home network (via WAN port), you can click on the map on the location. The geo coordinates will be retrieved. If you experience problems when retrieving the geo data, you can also use this page. (This step can also be executed at a later stage.)
Uplink
Select, if you want to share your internet uplink (=active node), or if your router should only mesh with other routers (=passive node, i.e. only forwarding traffic).
VPN-Key
You should have received a '.tgz file via Email, containing your VPN key.
Du solltest eine Email mit einer .tgz Datei erhalten haben. Wenn du Windowsnutzer bist kannst du diese Archivdatei mit [7zip] entpacken. Unter Windows fehlt die Endung "crt". Das ist die Datei ohne Endung und einem identischen Namen wie die .key Datei.
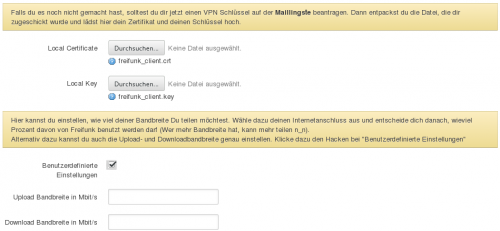
Bandwidth
If you have an active node, i.e. share your uplink, choose the band width you want to share. Please keep in mind to maintain a sensible ratio between up- and download - otherwise problems may occur. Ask for help, if neccessary.
Monitoring
Monitoring requires a lot of resources. Therefore it should only be enabled on routers from the WDR3000 and WDR4000 series.
IPs
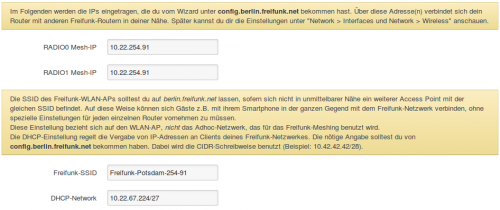
Radio0(2,4 GHz): Enter your Mesh IP.
Radio1(5 GHz): Enter your Mesh IP (will be changed later).
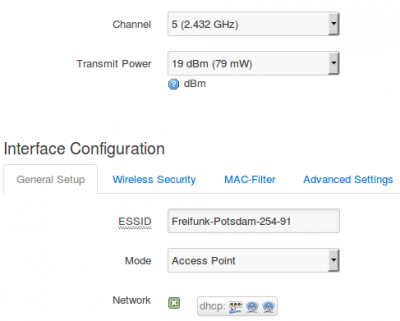
SSID: Freifunk-Potsdam-X-XX with X and XX the last two octets of your Mesh IP.
DHCP Range (Adressraum): DHCP network connecting devices via your router. Example: 10.22.67.224/27 (for network size 32)
Restart
The router should restart after you have provided all data.
After the restart it should be accessible via your IP.
Interfaces
- After the restart, log in as Administrator.
- Navigate to the menu item Network --> Interfaces.
DHCP-WLAN
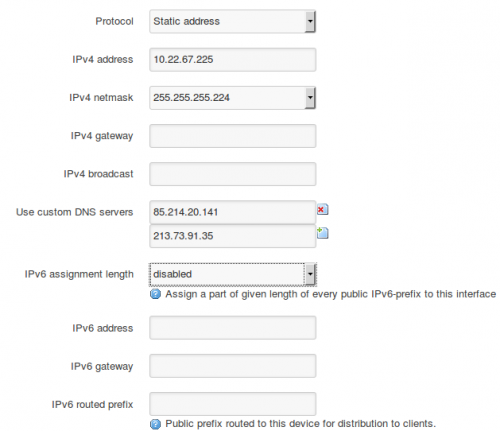
- Please check, that the IPv4 net mask corresponds to your selected network size (Example:
255.255.255.224for network size 32).- The first IP of your IP range is the network address. The wizard already assigned the second IP (i.e. the first after the network address) to your interface.
- It is recommended to use DNS server listed on the [CCC-Page]
- 85.214.20.141 (FoeBud)
- 194.150.168.168 (dns.as250.net; Berlin/Frankfurt)
- 213.73.91.35 (dnscache.berlin.ccc.de)
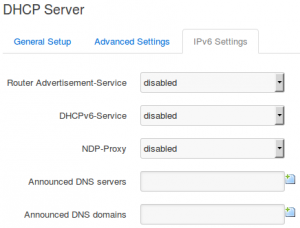
- IPv6 assignment: - disable
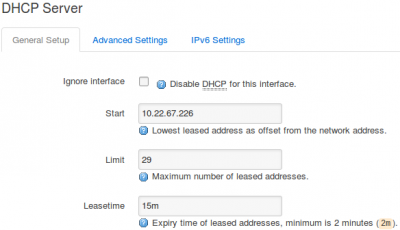
- Activate the DHCP server.
- Start IP: DHCP-IP+1
- Limit: Network size - 3 (network size 32: limit 29, network size 64: 61, ...)
- Laufzeit: 15 Minutes
- Disable all IPv6 settings.
|
|
Mesh-WLAN
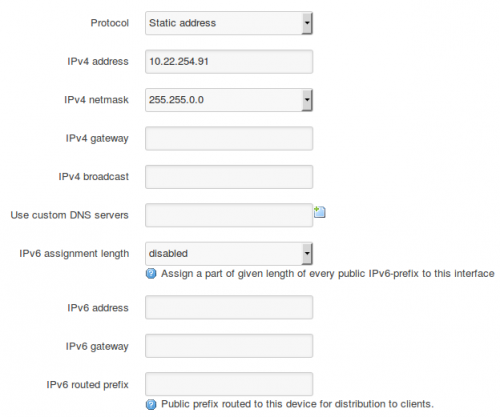
- IPv4 net mask:
255.255.0.0
- It is recommended to use DNS server listed on the [CCC-Page]
- 85.214.20.141 (FoeBud)
- 194.150.168.168 (dns.as250.net; Berlin/Frankfurt)
- 213.73.91.35 (dnscache.berlin.ccc.de)
- IPv6 assignment: - disable
Wireless 2,4 GHz
- Navigate to the menu item Network --> Wifi
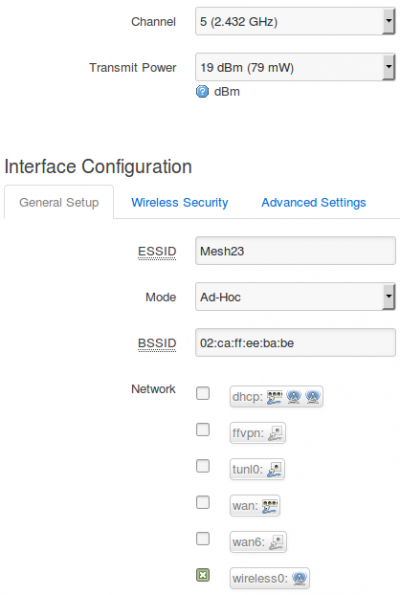
- Edit the wifi interface SSID:'?|Mode:Ad-Hoc
- Settings:
- Channel: 5
- ESSID: Mesh23
- BSSID: 02:ca:ff:ee:ba:be
Your setup should be similar to the image below.
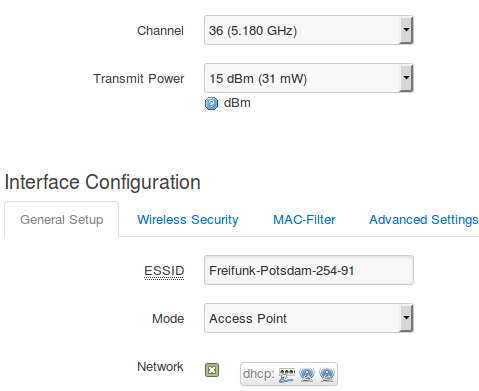
Wireless 5 GHz
- Navigate to Network --> Wifi and delete the Mesh-WLAN
- Edit the Access Point.
- ESSID: Mesh23
- Enable DHCP
- Navigate to Services -> OLSR IPv4.
- At the bottom of the page , delete the 5 GHz mesh interface (i.e. the interface without network).
OLSR
LQ algorithm
- Navigate to Services -> OLSRv4 -> Link Quality Settings -> LQ algorithm. Set on
etx_ffeth.
This changes the way how "hops" (i.e. individual steps in the network) are calculated.
Disable Smart Gateway
Since the Smart Gateway (SGW) functionality causes some problems, it should be disabled with the following steps:
- Connect via SSH to the router
- Remove the tunneling settings for SGW from /etc/config/olsrd . Delete or comment out with
#the following lines:
- Remove the tunneling settings for SGW from /etc/config/olsrd . Delete or comment out with
option RtTableTunnel '113'
option RtTableTunnelPriority '100000'
- In /etc/config/freifunk-policyrouting change the value for
fallbackto1.
- In /etc/config/freifunk-policyrouting change the value for
- Leave the console open and open the web interface in the browser
- Navigate to Services -> OLSRv4 -> SmartGateway and disable Smart Gateway
- Click on "Speichern & Anwenden"
- Restart the router from the console
exec reboot
StatusUpdates
Grafana - Node Overview
This tool is still in beta status!
Grafana is a visualisation of the system status of individual nodes. It displays:
- System load
- RAM
- CPU Load
- Network connections
- Connected clients
- DHCP leases
- Traffic
To install the script on the router, connect via SSH to the router:
ssh root@Router-IP
Execute the following command (copy & paste).
wget -q -O /tmp/ffp-collect http://seth0r.net/ffp-collect && chmod +x /tmp/ffp-collect && /tmp/ffp-collect install
After the first start, all interfaces will be displayed. It can be selected, which interfaces should not be monitored (e.g. private access points).
Commands:
Updating the script:
/etc/init.d/ffp-collect upgrade
Re-configuring the script:
/etc/init.d/ffp-collect install
Starting the script:
/etc/init.d/ffp-collect start
Stopping the script:
/etc/init.d/ffp-collect stop
Adding script to autostart:
/etc/init.d/ffp-collect enable
Removing script from autostart:
/etc/init.d/ffp-collect disable
Upload data manually:
/etc/init.d/ffp-collect upload
Background
- The script collects data in
/tmp/collstatevery minute. - Once an hour, the data will be upload to the server.

